I have decided that it is time for me, to learn something new. 🙂 After Cormac Hogan and Thomas Sauerer join our VMware TAM Customer Webinar Serie to talking about Data Services Manager, I decide that this is a great topic for my first VMware and Home Assistant Cross Post. A long time ago I decide that it is time to outsourcing my Home Assistant Database and with that there is a perfect time to do it. And to be honest, I’ve had a nice DSM t-shirt since my last Explore, which I also like to wear, but I hadn’t really looked into DSM until this TAM Customer Webinar.
First of all – If you would like to try DSM but don’t have a Homelab or Test Environment for it, you can use the Hands-On Labs (HOL-2549-01-VCF-L) to gain your first experience.
What it is
VMware Data Services Manager (DSM) is a solution for the management and use of databases integrated in your vSphere Environment. It provides a toolkit for on-demand provisioning, centralized control and a simplifies and automated management PostgreSQL and MySQL databases. Embedded for you as a vSphere admin in your vSphere infrastructure, it offers a self-service function for developers and the automation of routine tasks such as backups, patches and updates.
Download
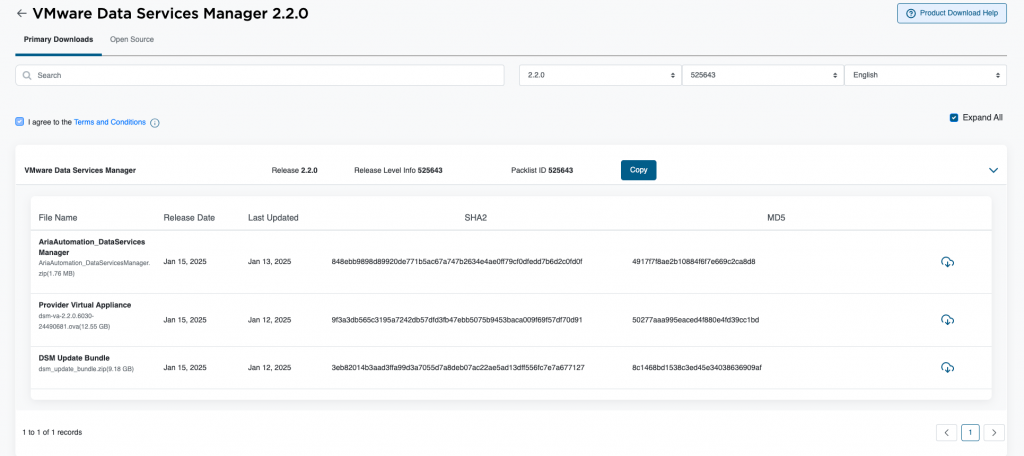
This Part is for the vSphere Administrator. Before we can deploy DSM in the next Part we need to Download the OVA from Broadcom Support Portal.
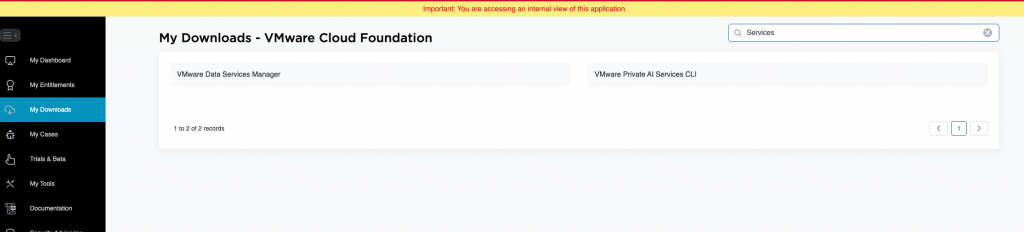
Under „My Downloads“ you can search for „Services“ and select „VMware Data Services Manager“.
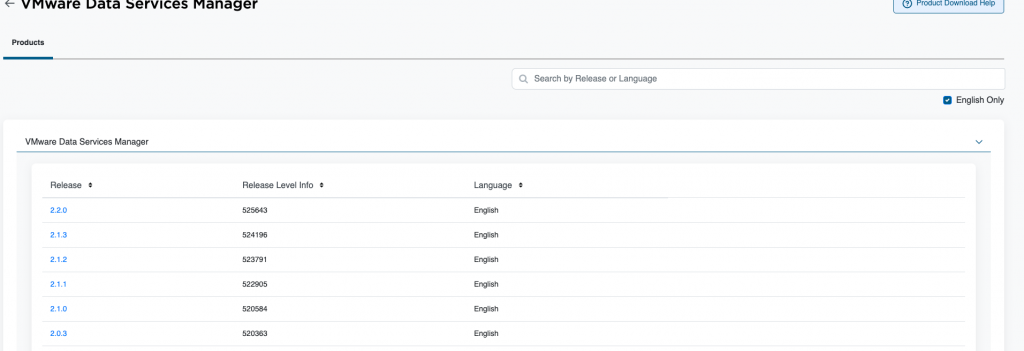
To display all possible versions, expand VMware Data Services Manager and select the desired version.
If it the first time that you deploy DSM download „Provider Virtual Appliance“. For an update you need to download DSM Update Bundle.
Don’t forget to check „I agree to the Terms and Conditions“ to enable the download buttons.
Deploy
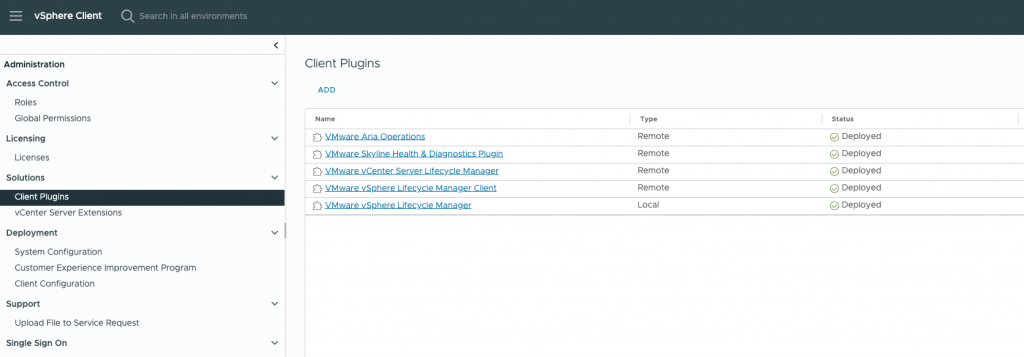
To deploy DSM it is important that you need to add the OVA via Administration > Solutions Client Plugins and not as usual in the inventory via the context menu. After click to „Add“ it’s the normal OVA Import Process Setup.
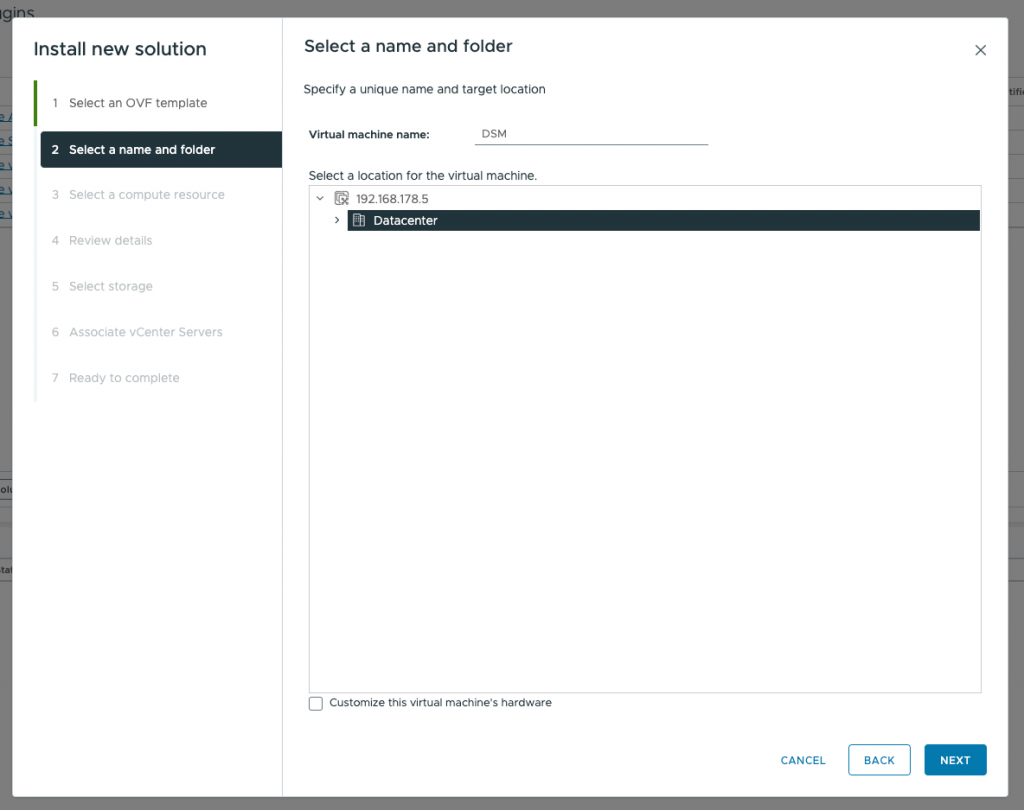
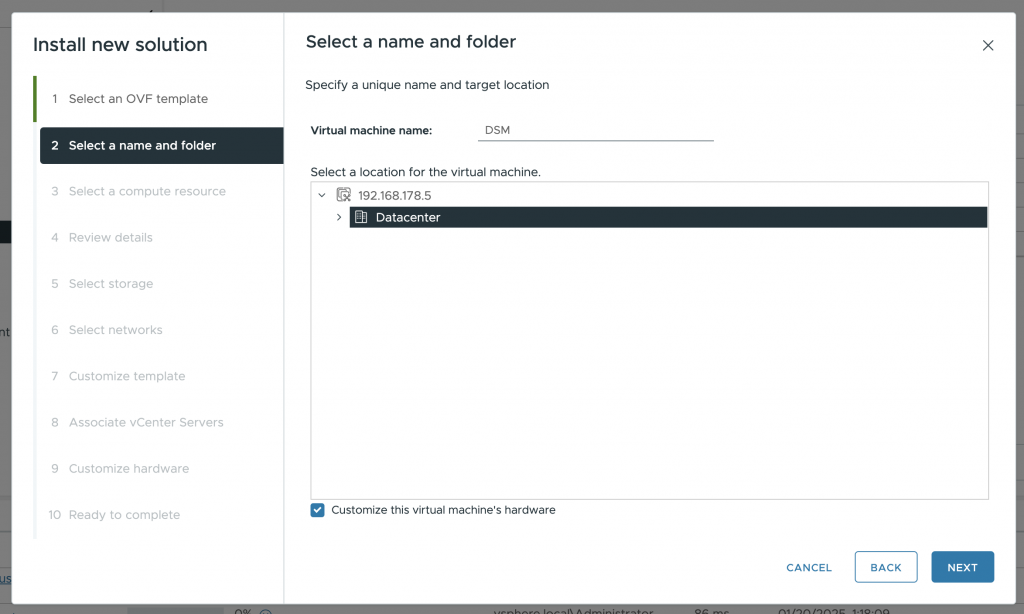
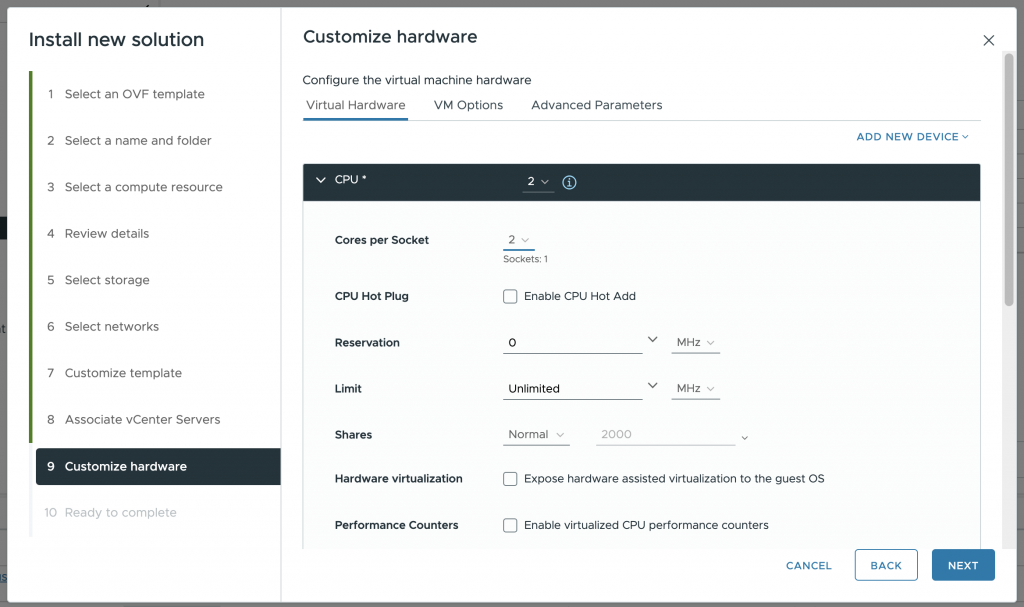
As I had not considered the Sizing in advance, my first deployment failed. And even if I don’t have to mention it, please note and compare the specs of the hosts and the DSM in advance. In my case, there were problems with the number of sockets. Therefore, please do not forget to select the checkbox “Customize this virtual machine’s hardware” under “Select a name and folder” so that the settings can be adjusted if necessary.
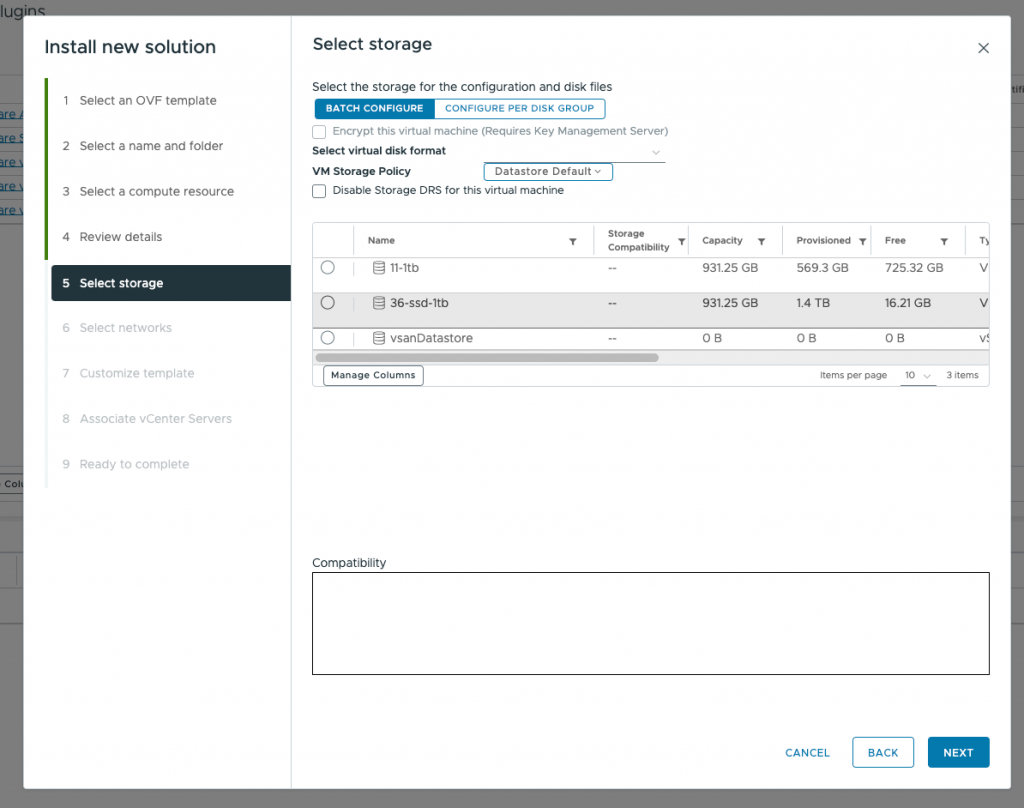
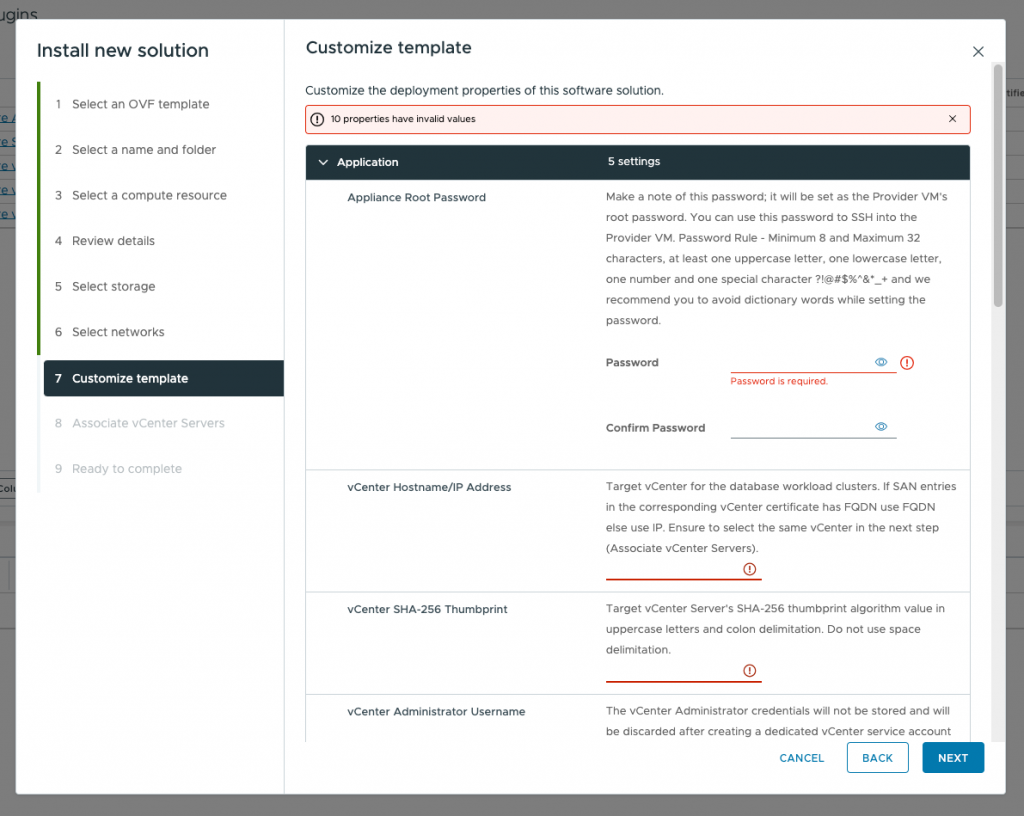
During deployment, you need to enter information on resources such as hosts, storage and network as usual. In addition to normal network settings and access data, the vCenter SHA-256 thumbprint is also required. Here you can find the information from KB312777 on how to get the thumbprint:
Required SHA-256 fingerprint
The SHA-256 fingerprint is a string of 64 hexadecimal digits, usually in pairs separated by spaces or other non-alphanumeric delimiters. To select the vCenter SHA-256 Thumbprint you need to connect to vCenter via SSH open, type shell and past the following command (KB312777):
echo | openssl s_client -connect localhost:443 2>/dev/null | openssl x509 -noout -fingerprint -sha256The output should look like this:
SHA256 Fingerprint=12:6A:F7:33:15:AA:6B:24:4D:34:B3:3D:28:4B:87:20:E1:8F:82:66:47:BB:4B:70:29:2A:D2:EA:FE:A0:56:41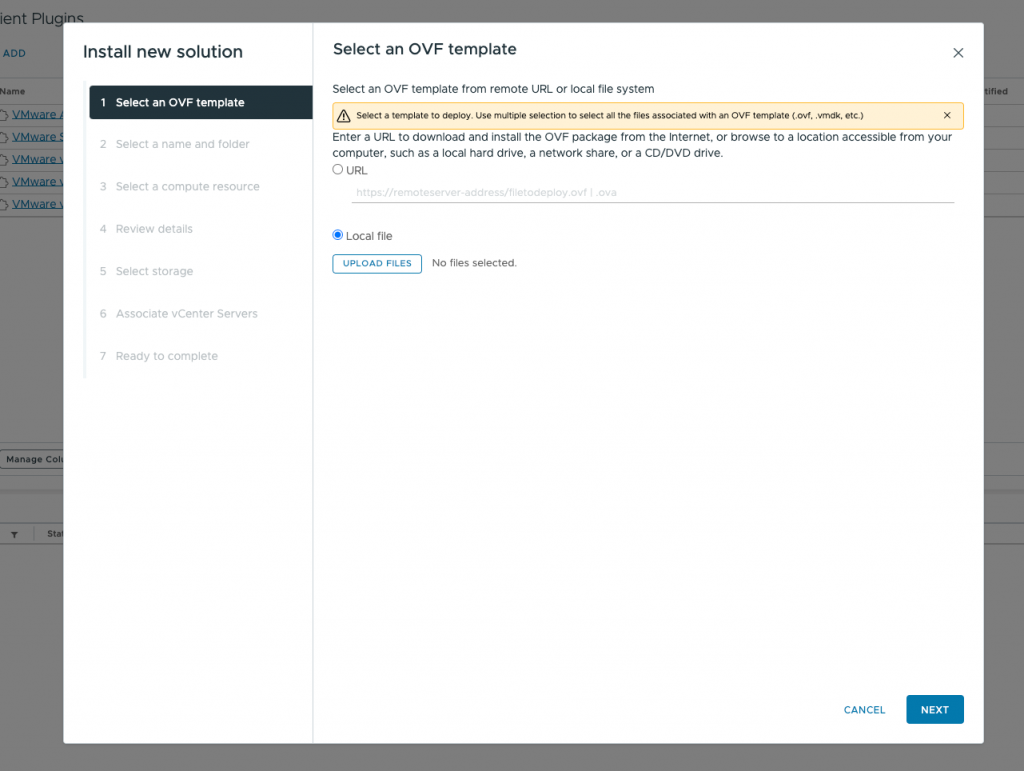

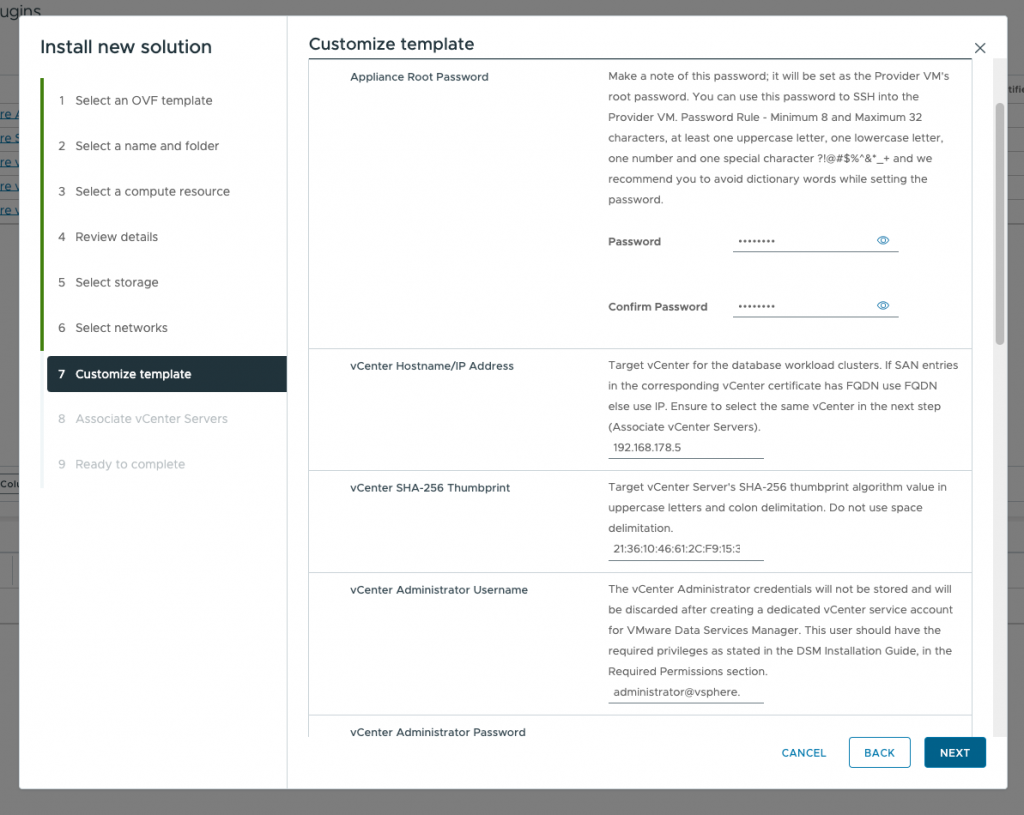
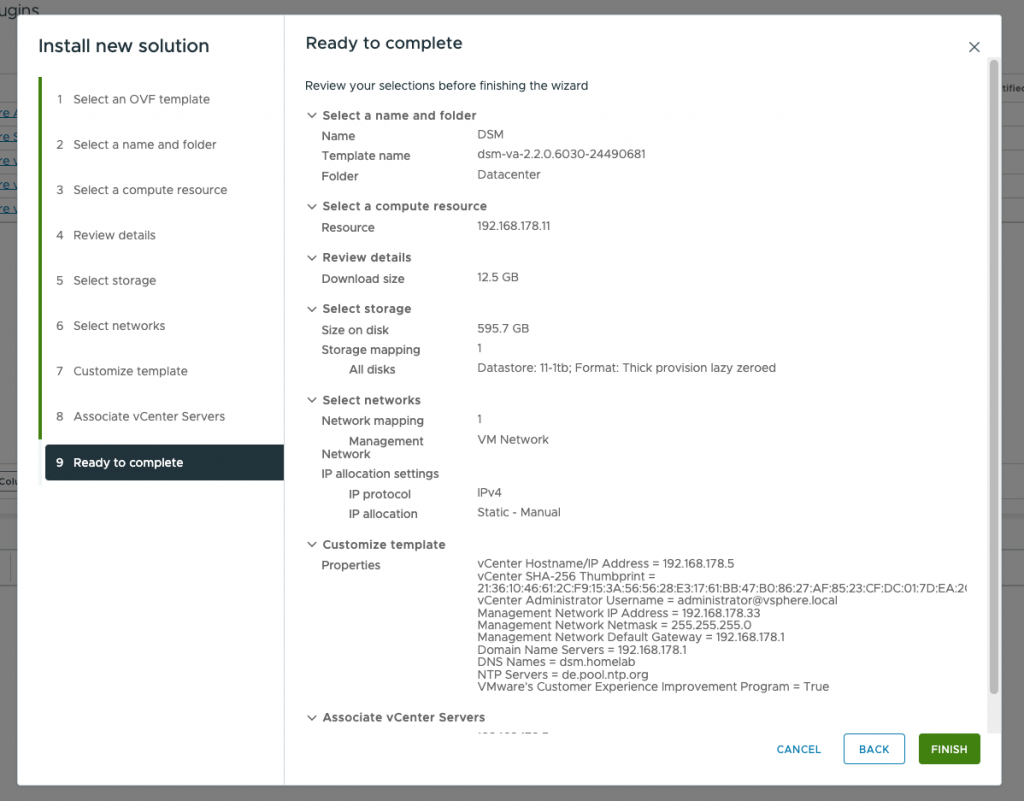

And if you do it right and take a look at the specs advance – the import / deployment Process worked as designed 😉
So if all Tasks are done you find the DSM in the Client Plugins overview and also in your Configuration Page of your vCenter.
Now it is time for the Setup.

Setup
To start with the Setup we need to move into the Configuration page of your vCenter in vCenter Inventory. Befor we start creating our first Infrastructure Policies there is something to prepare.
Preparing
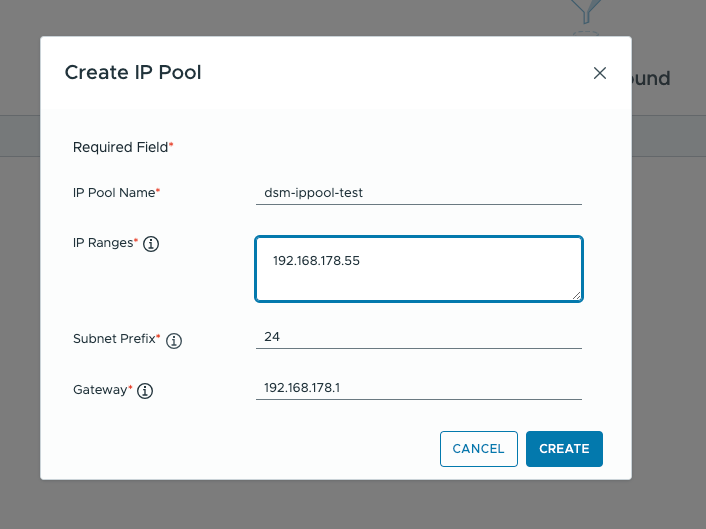
- Create IP Pool
- Create VM Classes
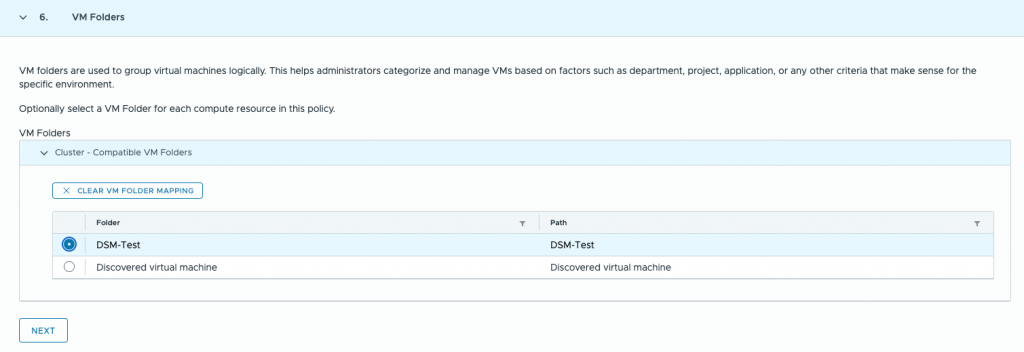
- Create VM Folder for DSM VMs
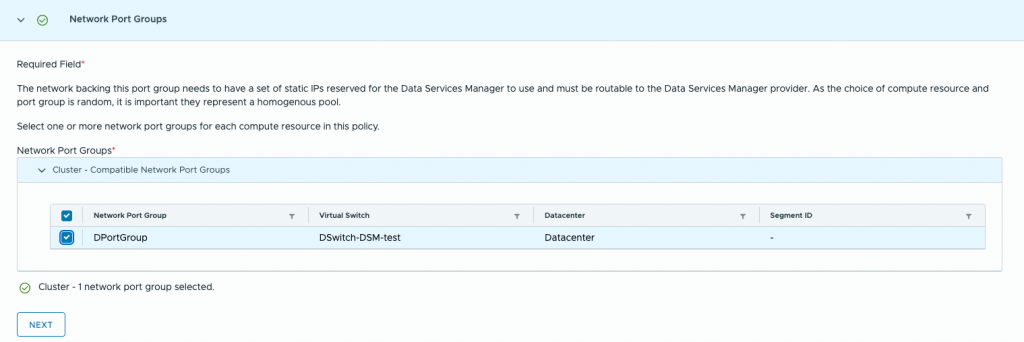
- Create Portgroup
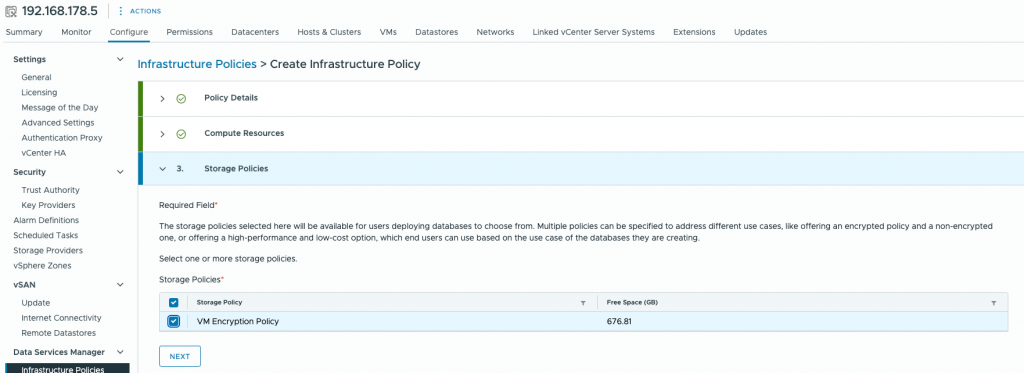
- Create Storage Policy
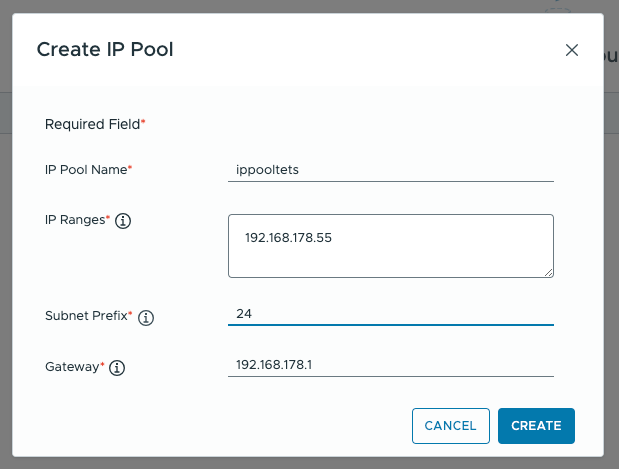
Create IP Pool
Set up a IP Pool for your Database. Subnet need to type as e.g. „24“ without /
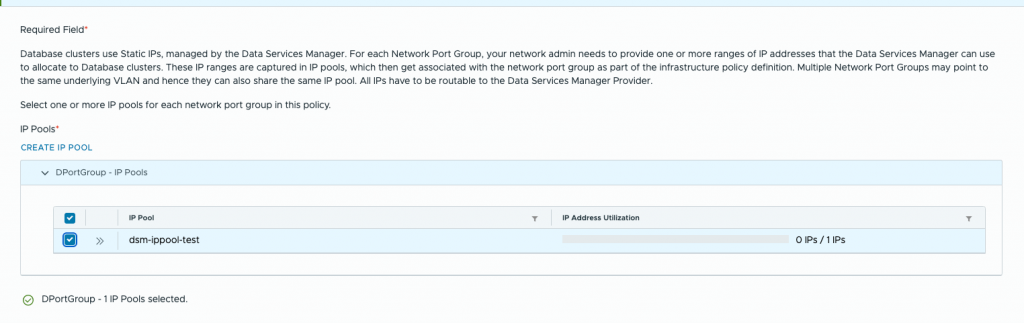
Database clusters use Static IPs, managed by the Data Services Manager. For each Network Port Group, your network admin needs to provide one or more ranges of IP addresses that the Data Services Manager can use to allocate to Database clusters. These IP ranges are captured in IP pools, which then get associated with the network port group as part of the infrastructure policy definition. Multiple Network Port Groups may point to the same underlying VLAN and hence they can also share the same IP pool. All IPs have to be routable to the Data Services Manager Provider. (source: DSM UI)
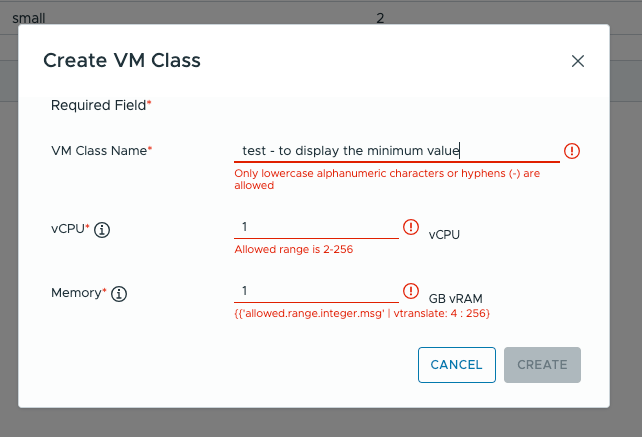
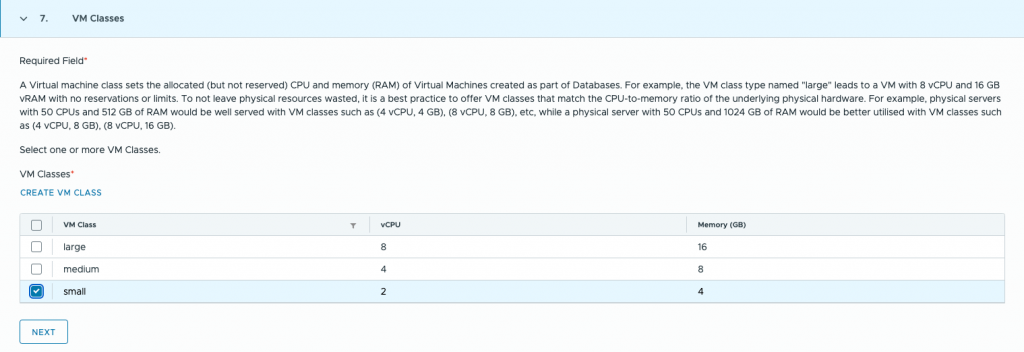
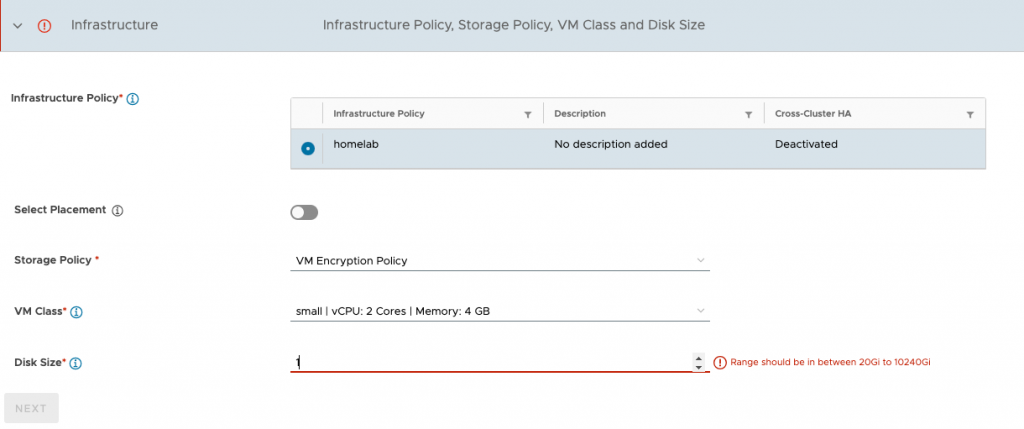
Create VM Class
The default VM class “small” is the minimum that can be created.
A Virtual machine class sets the allocated (but not reserved) CPU and memory (RAM) of Virtual Machines created as part of Databases. For example, the VM class type named „large“ leads to a VM with 8 vCPU and 16 GB vRAM with no reservations or limits. To not leave physical resources wasted, it is a best practice to offer VM classes that match the CPU-to-memory ratio of the underlying physical hardware. For example, physical servers with 50 CPUs and 512 GB of RAM would be well served with VM classes such as (4 vCPU, 4 GB), (8 vCPU, 8 GB), etc, while a physical server with 50 CPUs and 1024 GB of RAM would be better utilised with VM classes such as (4 vCPU, 8 GB), (8 vCPU, 16 GB). (source: DSM UI)
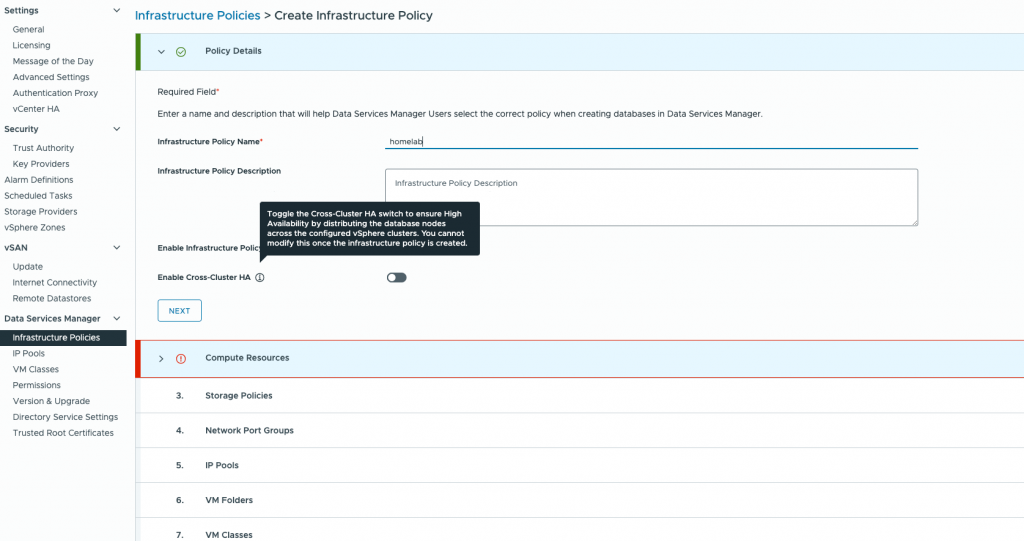
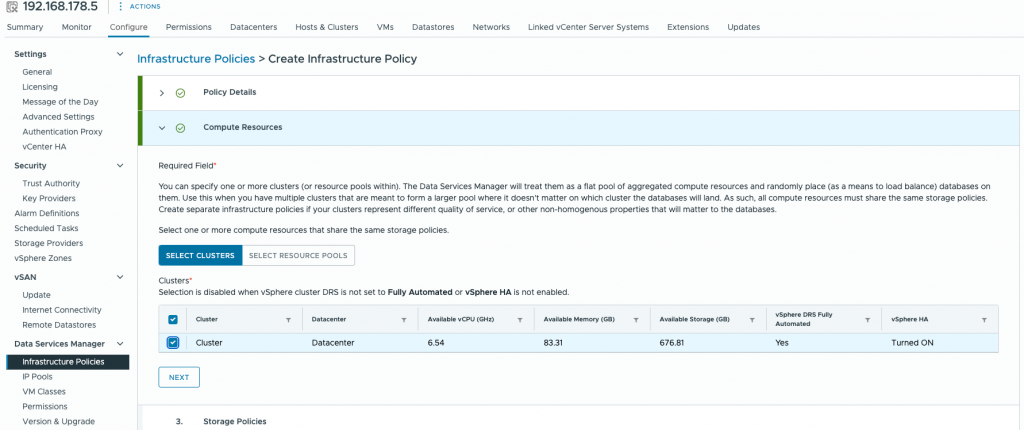
Start creating first „infrastructure policy“
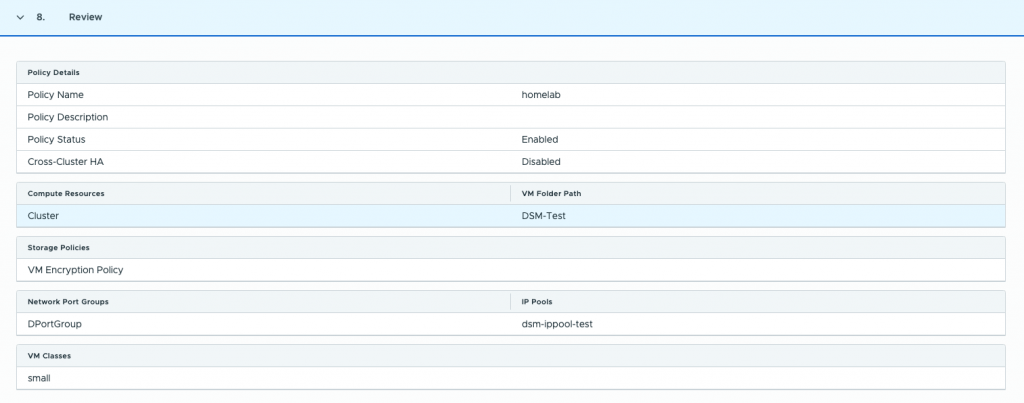
After these preparations, we can start creating our first infrastructure policy. Click on “Create” and enter a name for the policy. The policy is enable by default. If High Availablity requiered you need to select „Enable Cross-Cluster HA“. Now you can follow step by step and select everything we have prepared previously.

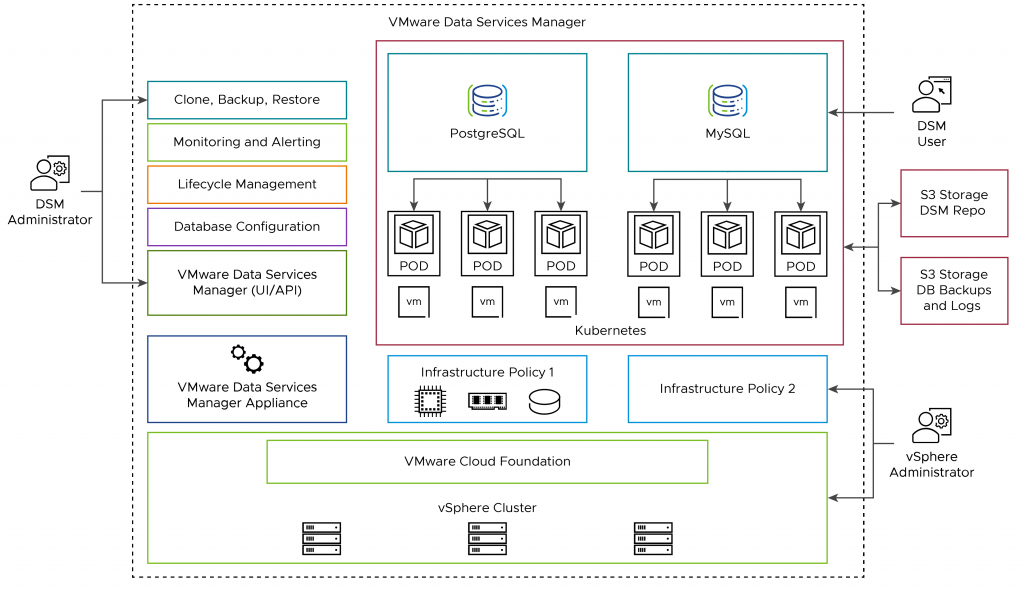
Referring to the architecture overview from the first part, the vSphere Administrator would now be finished with the deployment and hands over the login data to the DSM Administrator.
Note: Depending on whether the DB Admin or the vSphere Admin should configure the access, this can be done under “Directory service settings” in the DSM Config in the vCenter, or by the DB Admin in the DSM console.
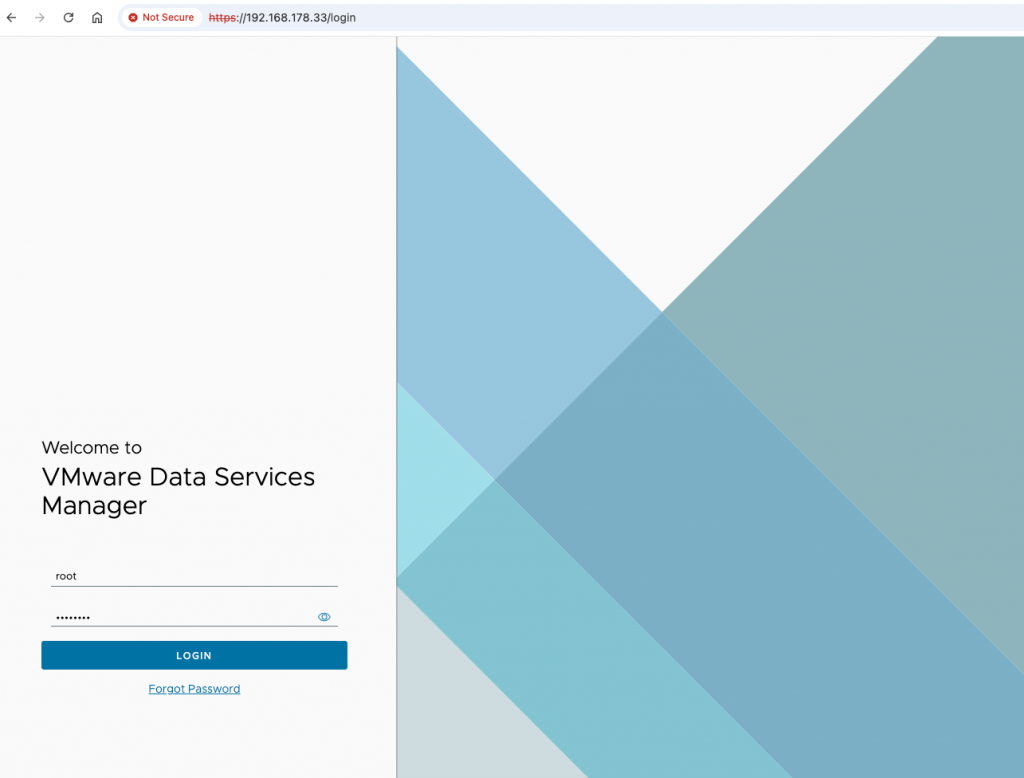
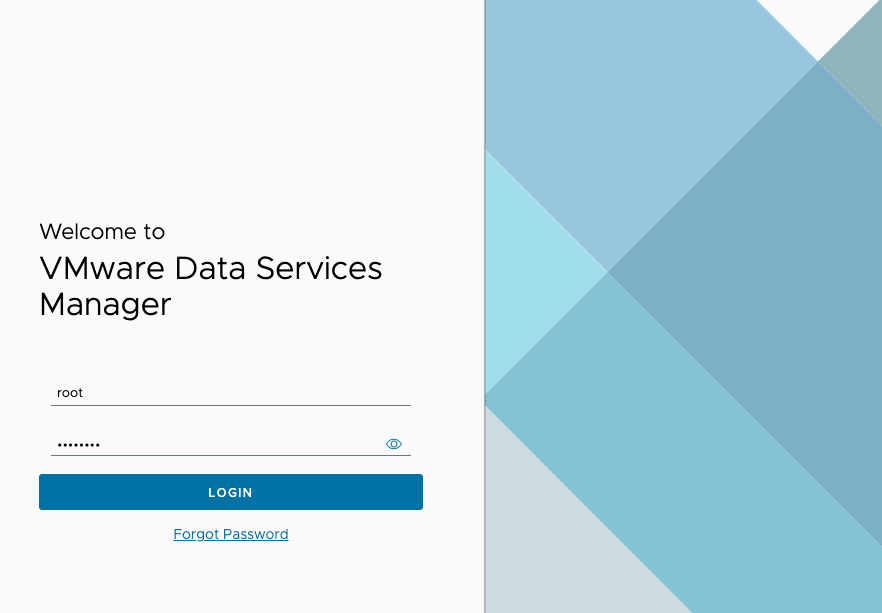
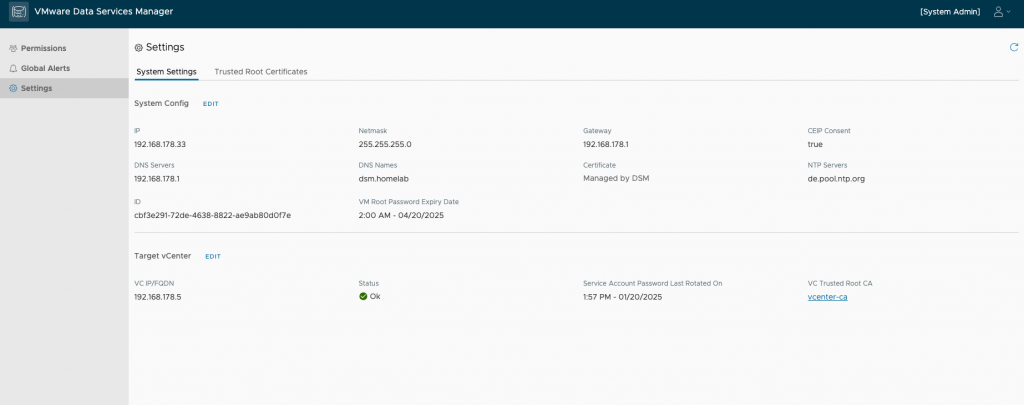
After first login into DSM Appliance as root we can check our Settings from deployment under „Settings“
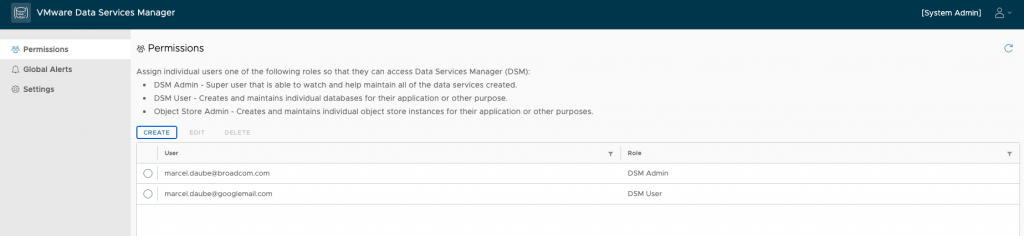
If everything is as expected we need to start to create Users and Permissions in „Permissions“. So click in „Create“ and type email and PWD for your DSM Admin and if desired also for the user(s).
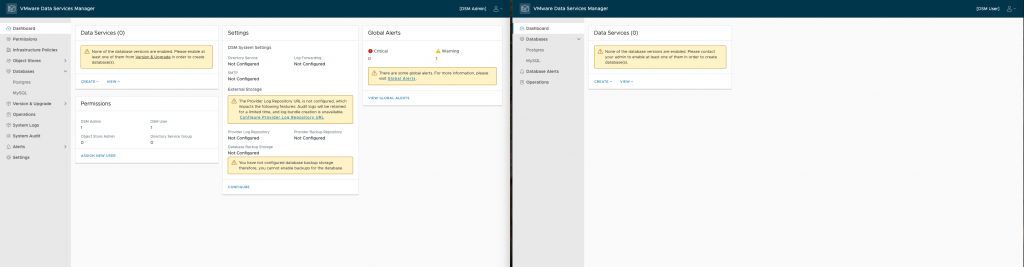
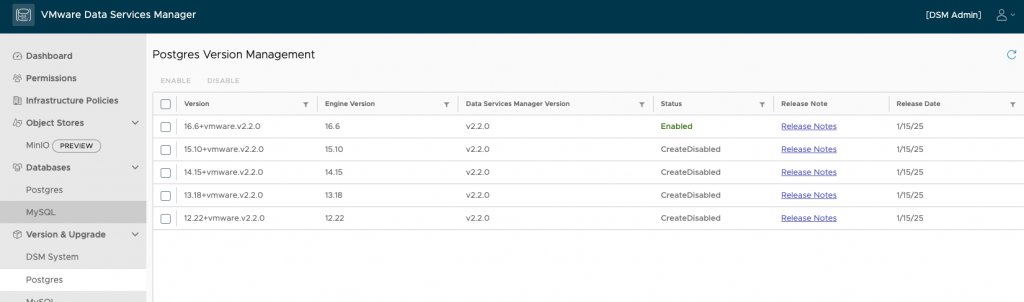
After logout your root User, login as Administrator for the last configuration steps. Please note that you need to enable a Database Version before your admins log into the Appliance. At the Moment Postgres / MySQL and Object Stores MinIO are available. To enable a Version, open „Version & Upgrade“ and select one of the them. If you want to start with Postgres open it and select a Version that is allowed in your company / Homelab. Click on Enable and your
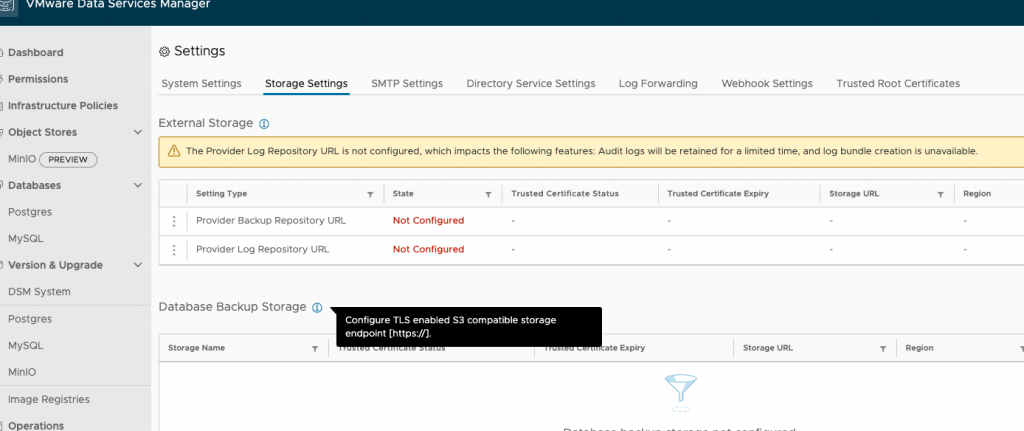
Admins can select this Version to create a Database. The admin does not have to log in again if you activate a version while the admin is logged in. To provide a Backup Location for your DB Admins you need to „Configure TLS enabled S3 compatible storage endpoint [https://]“ under Settings > Storage Settings in DSM as DSM Admin. Click unter „External Storage“ on 3dot Menu infront of „Provider Backup Repository URL“.
Create Database
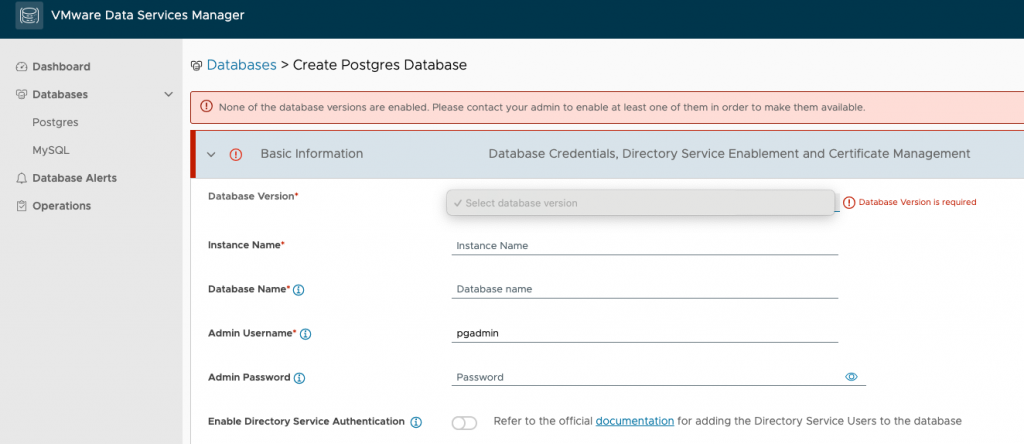
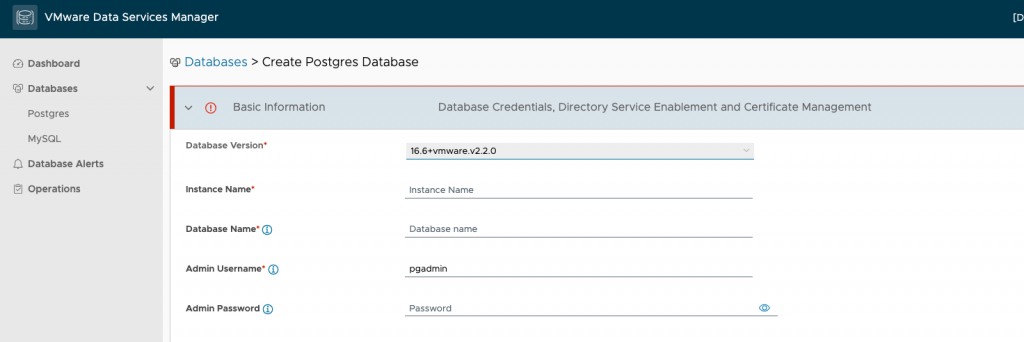
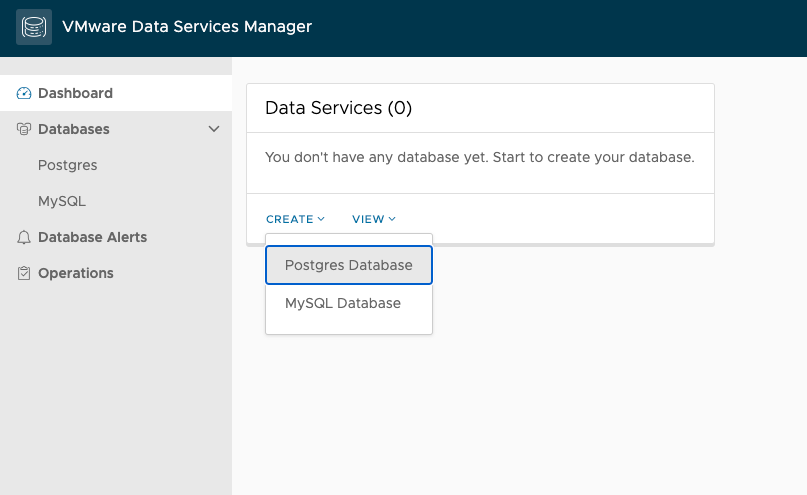
For my Home Assistant I start to create a Postgres Database. As this is Part of the Database admin, we need to login with our Database User Credentials we configure in the last Part. The Database Admin is done now. After login you got an overview about the created Databases. After select „Create“ you can choose if you like to create a Postgres or a MySQL Database.
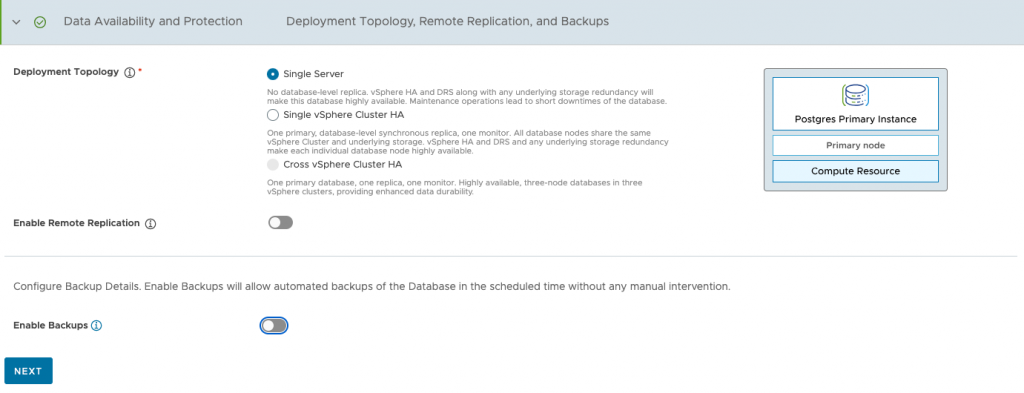
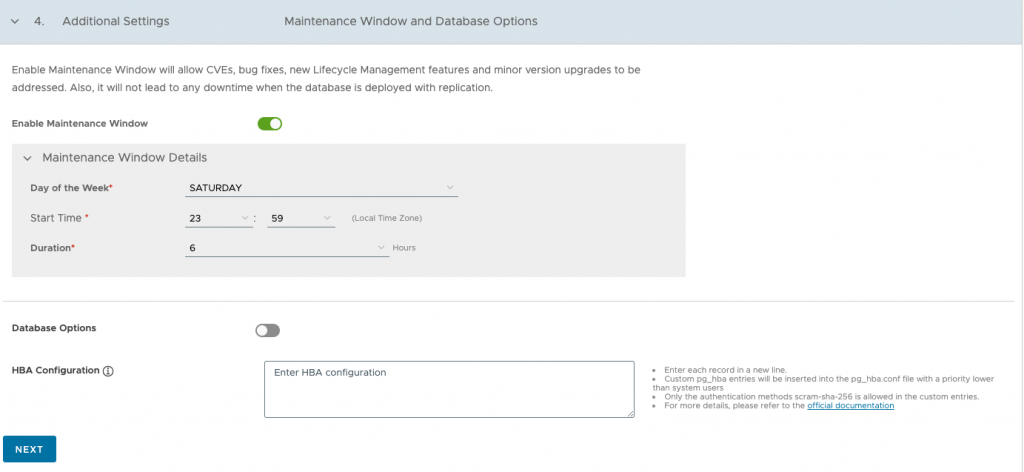
Now we need to select a Database Version which was approved via a DSM Admin. Also Part of the Basic Information are Database Name and Admin Credentials. If necessary you can select a Custom Certificate – otherwise it is a DSM-Managed. In case you would like a Custom Certificate you need to know that RSA, ECDSA and ED25519 are the accepted algorithms. But Passcodes or passwords are not supported. Part two is the Data Availabilty and Protection. Depending on the previous deplyoment you can select one of the deployment types (see table below) and if you set up a Backup Location you can select it now for your DB, if not you need to uncheck the button. In Part 4 you can enable a Maintenance Window. If enable Maintenance Window you will allow CVEs, bug fixes, new Lifecycle Management features and minor version upgrades to be addressed. Also, it will not lead to any downtime when the databa se is deployed with replication. If you need to add Database Options you can add parameter enable this point. At least you got an Summary about your Database you would like to create.
Deployment Topology
| Single Server | Single vSphere Cluster HA | Cross vSphere Cluster HA |
|---|---|---|
| No database-level replica. vSphere HA and DRS along with any underlying storage redundancy will make this database highly available. Maintenance operations lead to short downtimes of the database. | One primary, database-level synchronous replica, one monitor. All database nodes share the same vSphere Cluster and underlying storage. vSphere HA and DRS and any underlying storage redundancy make each individual database node highly available. | One primary database, one replica, one monitor. Highly available, three-node databases in three vSphere clusters, providing enhanced data durability. |


After your Database was creating successful you find a full Summary of your database after clicking on your „Instance Name“ – in my case „homeassistant“. There is also a link to copy your connection string
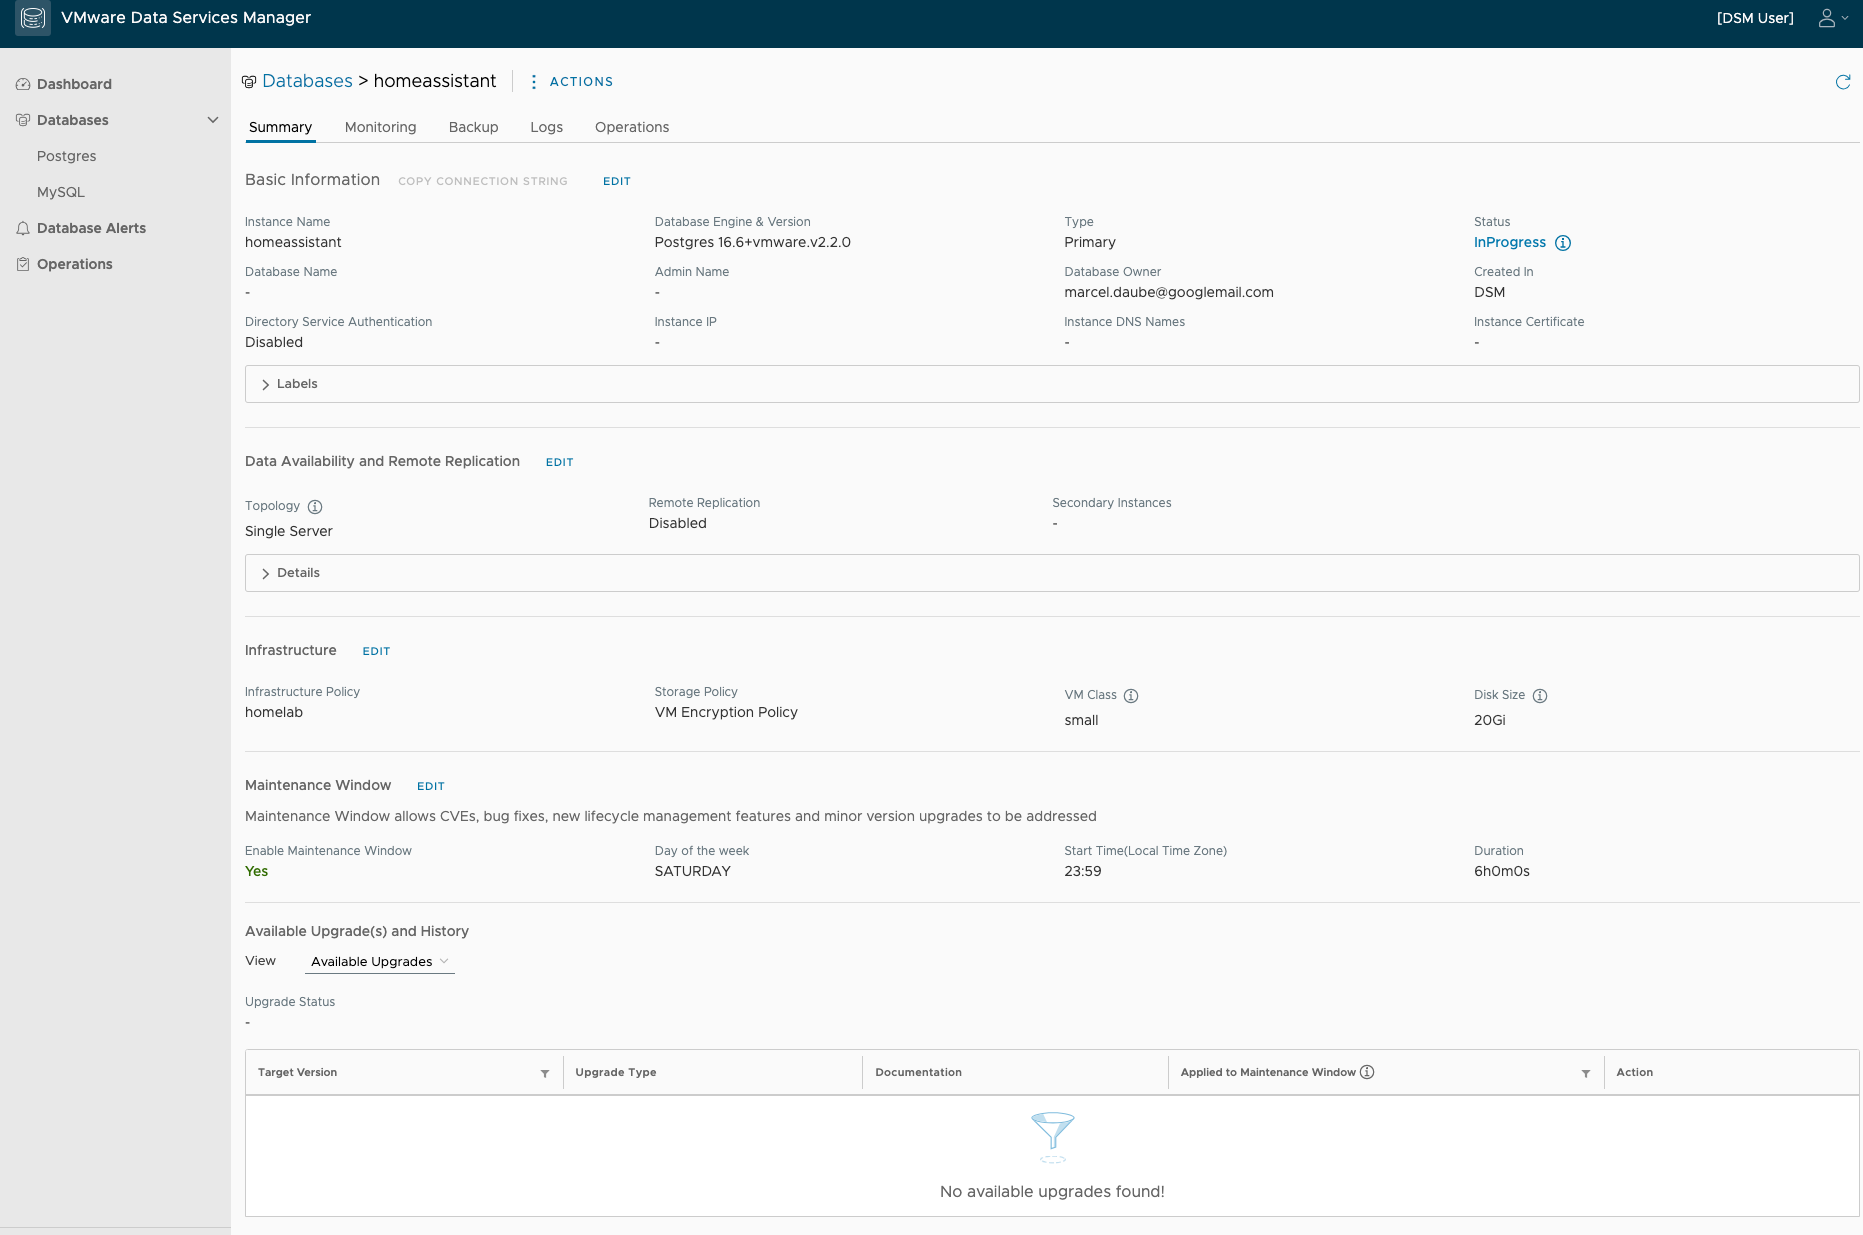
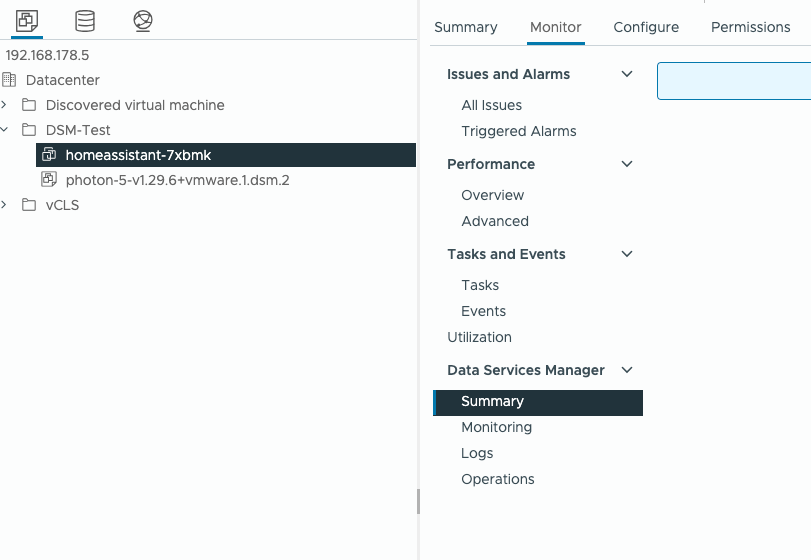
Back to the vCenter administrator, you now find this database as a VM in the vCenter inventory. There is now also a new menu for the DSM VMs under Monitor.
Issues
internal error creating kubernetes cluster
"message": "internal error creating kubernetes cluster: Get \"https://192.168.178.80:6443/api/v1/namespaces?timeout=10s&timeoutSeconds=10\": context deadline exceeded: error provisioning kubernetes cluster",
Install Solution failed – No Host is compatible with the virtual machine.
Unfortunately I had not enough Sockets (Sockets 8) to start the Appliance. For this reason, the Install Solution is failed. I found KB313175 who discriped how to start the „Install Solution“ Process manual. Fortunately for me, the „Additional Imformation“ that KB is only applicable to DSM 2.0.0 and 2.0.1 was wrong. After adjust the CPU Settings to 1 Socket 4 Cores I following the steps from KB313175 and start the Solution Install manual
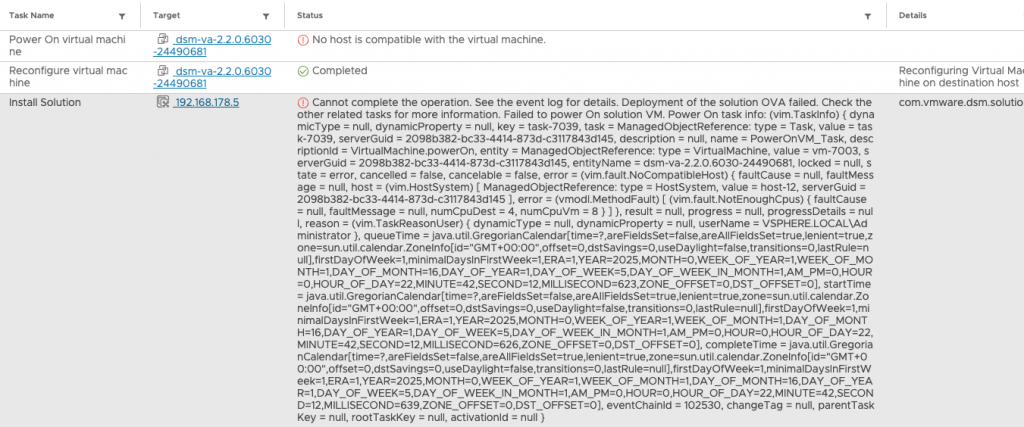
Error Description
No host is compatible with the virtual machine.
Cannot complete the operation. See the event log for details. Deployment of the solution OVA failed. Check the other related tasks for more information. Failed to power On solution VM. Power On task info: (vim.TaskInfo) { dynamicType = null, dynamicProperty = null, key = task-7039, task = ManagedObjectReference: type = Task, value = task-7039, serverGuid = 2098b382-bc33-4414-873d-c3117843d145, description = null, name = PowerOnVM_Task, descriptionId = VirtualMachine.powerOn, entity = ManagedObjectReference: type = VirtualMachine, value = vm-7003, serverGuid = 2098b382-bc33-4414-873d-c3117843d145, entityName = dsm-va-2.2.0.6030-24490681, locked = null, state = error, cancelled = false, cancelable = false, error = (vim.fault.NoCompatibleHost) { faultCause = null, faultMessage = null, host = (vim.HostSystem) [ ManagedObjectReference: type = HostSystem, value = host-12, serverGuid = 2098b382-bc33-4414-873d-c3117843d145 ], error = (vmodl.MethodFault) [ (vim.fault.NotEnoughCpus) { faultCause = null, faultMessage = null, numCpuDest = 4, numCpuVm = 8 } ] }, result = null, progress = null, progressDetails = null, reason = (vim.TaskReasonUser) { dynamicType = null, dynamicProperty = null, userName = VSPHERE.LOCAL\Administrator }, queueTime = java.util.GregorianCalendar[time=?,areFieldsSet=false,areAllFieldsSet=true,lenient=true,zone=sun.util.calendar.ZoneInfo[id="GMT+00:00",offset=0,dstSavings=0,useDaylight=false,transitions=0,lastRule=null],firstDayOfWeek=1,minimalDaysInFirstWeek=1,ERA=1,YEAR=2025,MONTH=0,WEEK_OF_YEAR=1,WEEK_OF_MONTH=1,DAY_OF_MONTH=16,DAY_OF_YEAR=1,DAY_OF_WEEK=5,DAY_OF_WEEK_IN_MONTH=1,AM_PM=0,HOUR=0,HOUR_OF_DAY=22,MINUTE=42,SECOND=12,MILLISECOND=623,ZONE_OFFSET=0,DST_OFFSET=0], startTime = java.util.GregorianCalendar[time=?,areFieldsSet=false,areAllFieldsSet=true,lenient=true,zone=sun.util.calendar.ZoneInfo[id="GMT+00:00",offset=0,dstSavings=0,useDaylight=false,transitions=0,lastRule=null],firstDayOfWeek=1,minimalDaysInFirstWeek=1,ERA=1,YEAR=2025,MONTH=0,WEEK_OF_YEAR=1,WEEK_OF_MONTH=1,DAY_OF_MONTH=16,DAY_OF_YEAR=1,DAY_OF_WEEK=5,DAY_OF_WEEK_IN_MONTH=1,AM_PM=0,HOUR=0,HOUR_OF_DAY=22,MINUTE=42,SECOND=12,MILLISECOND=626,ZONE_OFFSET=0,DST_OFFSET=0], completeTime = java.util.GregorianCalendar[time=?,areFieldsSet=false,areAllFieldsSet=true,lenient=true,zone=sun.util.calendar.ZoneInfo[id="GMT+00:00",offset=0,dstSavings=0,useDaylight=false,transitions=0,lastRule=null],firstDayOfWeek=1,minimalDaysInFirstWeek=1,ERA=1,YEAR=2025,MONTH=0,WEEK_OF_YEAR=1,WEEK_OF_MONTH=1,DAY_OF_MONTH=16,DAY_OF_YEAR=1,DAY_OF_WEEK=5,DAY_OF_WEEK_IN_MONTH=1,AM_PM=0,HOUR=0,HOUR_OF_DAY=22,MINUTE=42,SECOND=12,MILLISECOND=639,ZONE_OFFSET=0,DST_OFFSET=0], eventChainId = 102530, changeTag = null, parentTaskKey = null, rootTaskKey = null, activationId = null }More Infos about DSM
- VMware Data Services Manager Product Page
- Release Notes
- Hardware Specs
- Hands-On Labs (HOL-2549-01-VCF-L)
- Cormac Hogan – Blog – Youtube Webinar Serie – DSM 2.0 / 2.1 / 2.2